Author Topic: 3D) My first attempt  (Read 851 times)

Magerranger

  • Hydlaa Resident
  • *
  • Posts: 64
    • View Profile
3D) My first attempt
« on: September 25, 2004, 07:23:55 am »
ok this is my first attempt to model a female biped so its not perfect (actualy its far from it, looks like a body builder kinda)

Its not supposed to have hair because i have no idea how to do it, and i have already noticed that its arems are too small but fell free to tear it apart cos thats the only way ill get better.


\"Jesus Wept\"

Moogie

  • Forum Legend
  • *
  • Posts: 4551
  • Artist/Flash Animator
    • View Profile
(No subject)
« Reply #1 on: September 25, 2004, 07:53:58 am »
I took the liberty of drawing a diagram to better explain my points below. I\'m by no means some sort of anatomy expert, but I hope this will help you somewhat. Don\'t take the diagram too literally... it\'s very flawed. I just drew it as a guide.


The shoulders are too broad for a female IMO. If you connected the arms to the shoulders, rather than midway down the torso (See 3), I think she would look much more femenine already. :)

The boobs should probably start higher, as they seem to be growing out of her stomach (See 2). The curve starts from the collarbone and teardrops towards the center of gravity (i.e. downwards). On average, they end about halfway down the ribcage (See 4). Please don\'t ask where I\'m getting all this from... just... don\'t ask. :P *crosses her arms and continues*

The legs arn\'t bad. I can\'t pick out any paticular fault with them, although they could look better somehow... try slimming them down a bit, but not the thighs. Just define the pelvis some more so there is a clear different between it and her stomach (See 5).

Back to the shoulders again, try and make the drop from the neck more horizontal, rather than curving downwards. The collarbone defines this shape from the base of the neck untill it reaches the shoulderbones, which is where the curve down the arms begins (See 1).

That\'s all for now, great work, and keep practicing. :)

Icefalcon

  • Veteran
  • *
  • Posts: 1610
    • View Profile
(No subject)
« Reply #2 on: September 25, 2004, 08:46:06 am »
Ive seen worse Magerranger, keep working at it  :)

Magerranger

  • Hydlaa Resident
  • *
  • Posts: 64
    • View Profile
(No subject)
« Reply #3 on: September 25, 2004, 09:35:41 am »
I did some of the stuff you said moogie, i also smoothed and give it a basic uv, this new picture shows i have problems joining the 2 sides or that im realy good at making charicters like 2-face of batman


\"Jesus Wept\"

Moogie

  • Forum Legend
  • *
  • Posts: 4551
  • Artist/Flash Animator
    • View Profile
(No subject)
« Reply #4 on: September 25, 2004, 09:47:56 am »
Ah, a great improvement, you should be proud. :) I\'m afraid I don\'t know anything about 3D modelling, so I can\'t help with the joining of the sides. Isn\'t there a way to merge them together or something?

Let\'s see... the most obvious thing for me is still the chest. If you refer to point 3 on the diagram, the line from the breast follows the line joining to the lower shoulder. This is because there is one muscle running along there (seen on both males and females; if you raise your arm, the muscle from your shoulder that joins to the chest also pulls your chest up a bit). For this to be correct on the model, her boobs need to be further apart. :P Hehe, there\'s no \"nice\" way to describe things like that, it sounds so weird... *giggle* Anyway, I\'m not sure how clear that is to understand. :)

Keep going, it really does look great!

DepthBlade

  • Veteran
  • *
  • Posts: 1838
    • View Profile
(No subject)
« Reply #5 on: September 25, 2004, 10:32:18 am »
heh think of it this way you are doing what tons of people can\'t do and you are improving as we can see by that second picture. Now those 3-D models look simular if not better then R00nscape 2, so theres something to be proud of :) Good luck, practice makes perfect

Magerranger

  • Hydlaa Resident
  • *
  • Posts: 64
    • View Profile
(No subject)
« Reply #6 on: September 25, 2004, 12:22:30 pm »
Thanx for your support guy\'s i think this is the last improvement to this ill post today but i think i got the edge over runescape now. Theres just a small problem with the lighting at the top/start of the breasts, where its lighter than the shoulders. Other than that it needs hand detail and animations.


*I decided squares make poor breasts and made them from sphears ;)

\"Jesus Wept\"

Karyuu

  • Forum Legend
  • *
  • Posts: 9341
    • View Profile
(No subject)
« Reply #7 on: September 25, 2004, 12:31:03 pm »
The arms bother me quite a bit... They seem .. erm, without much mass compared to the rest of the body. She has large shoulders, but from the elbow down the arms are much shorter than they should be. Also, it\'s kinda hard to pinpoint where her knees are, and the space between her legs seems too much right now ;) Still, it\'s improved quite a bit along the way.
Judge: Are you trying to show contempt for this court, Mr Smith?
Smith: No, My Lord. I am attempting to conceal it.

Magerranger

  • Hydlaa Resident
  • *
  • Posts: 64
    • View Profile
(No subject)
« Reply #8 on: September 25, 2004, 12:38:38 pm »
firstly there is some leg you cant see in that wide gap between her legs... the rendere in 3dsmax light options confuse me so its just from above (ergo you cant see the under legs because you need light to see :) )

secondly :DOH: knees i knew i missed somthing ill bump map em on later :p

Thirdly, How come mogura is no longer a mod? its kinda scary thinkin she wont be there to keep us in line (unless its a temp bug)

finaly, I concede the fact the arms are puny ill pretend its delibarate for now because... shes a.... mutant? or alien...

\"Jesus Wept\"

Zeraph

  • Hydlaa Notable
  • *
  • Posts: 658
    • View Profile
(No subject)
« Reply #9 on: September 25, 2004, 01:09:08 pm »
looks good so far, although it may be a little two low-poly for visual appearance sake, so what you do is apply a \"MeshSmooth\" onto the stack with 1 literation:


You can also apply MeshSmooth to only a part of your mesh by selecting polygons verts or edges, but make sure to uncheck \"[ ] Apply to Whole Mesh\":


I think you may want to do this to the arms, but anyway I hope this helps...  :D

CB Characters: Zeph Waterfox & Zeraph Waterfox MB: Zph

Magerranger

  • Hydlaa Resident
  • *
  • Posts: 64
    • View Profile
(No subject)
« Reply #10 on: September 25, 2004, 01:32:42 pm »
spaner to that plan: selecting the areas you wish to mech smooth makes the uvw unwrap only apply to said objects which means mapping it again!! i hate mapping!!

sorry... :(

[edit]

Nope they are stayin square cos i cant get it to map the rest of the body when its smoothing only a section and if its not smoothing a section but all of it, it splits the head in 2
« Last Edit: September 25, 2004, 01:48:52 pm by Magerranger »

\"Jesus Wept\"

Zeraph

  • Hydlaa Notable
  • *
  • Posts: 658
    • View Profile
(No subject)
« Reply #11 on: September 25, 2004, 03:04:53 pm »
sounds like you didn\'t weld the verts or something. Also if you are getting creases in your mesh after MeshSmooth that ether means you need to weld or you need to make all surfaces the same smoothing group.
also, if you mirror an object using instance then you will not be able to attach it to the other side, use copy then attach it...

If you are getting something like this as a render:


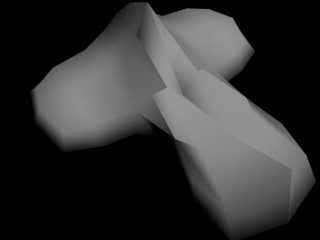
Here is how to fix it:
First of all, lets make sure all of the verts are welded right, so go to verts sub-object level & select all of the verts: Then scroll down to the Weld Part & set the [Selected] value to about 5. this will really depend on how big your model is in max units:

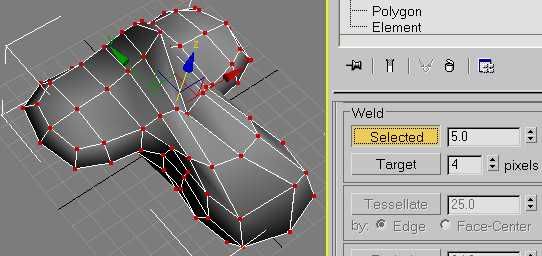
if the selected value is to high then it will look something like this:

(This is actually not such a bad way of optimizing a model with to many polygons also... )

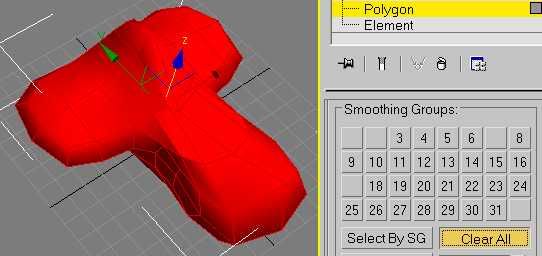
now we have it all welded, we can smooth it. go to Polygon sub-object level & select all of the polygons. then [Clear All] then Select [1]:

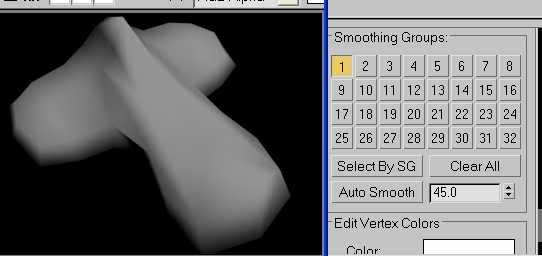
That should take care of the creases in your model.
Now you can use mesh-smooth, I think it uses the same UV mapping coords so it will not matter if you use mesh smooth, the model will not change textures... :D
Just remember that every literation of MeshSmooth make x3 the original polycount, so if it\'s 300tri then it will be 900tri after MeshSmooth.


Now lets take care of the Shadows thing in Rendering:
Lets say you have something like this:

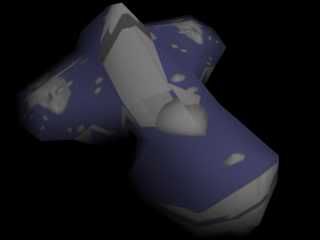
Not all the polygons show up on the sides & makes it look like it is missing something...

This is simple to fix, go to the Materials Windows [M] is shourtcut... select your material \"Self-Illumination\" value to about 50:

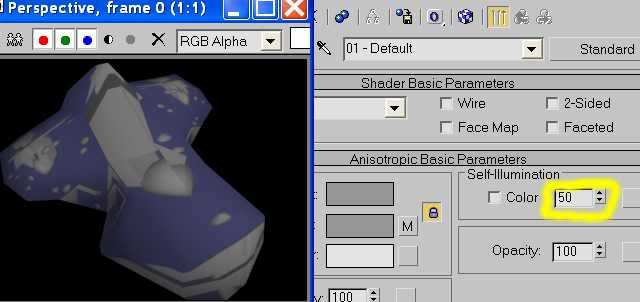
The more self-illumination, the less shadows you will have from smothing... It really just makes it like there are lights surrounding the model... Good for low-poly...


I really hope this helps...

CB Characters: Zeph Waterfox & Zeraph Waterfox MB: Zph

Magerranger

  • Hydlaa Resident
  • *
  • Posts: 64
    • View Profile
(No subject)
« Reply #12 on: September 26, 2004, 06:25:28 pm »
Thanx zeraph i used some of those techniques when making this new model, i thikn its much better as it has facial features but i still cant do arms!


\"Jesus Wept\"

Zeraph

  • Hydlaa Notable
  • *
  • Posts: 658
    • View Profile
Wow that is great.
« Reply #13 on: September 29, 2004, 03:56:30 pm »
I didn\'t even try to do humanoid models before starting my Klyros. Arms are hard because they are supposed to bend. try to go through the \"Rigging Characters With Bones\" tutorial in 3DsMax. because you usually need bones to correctly bend arms to make them look right.I usually model arms with a big bulge then a skinny part for the elbow & then another one. I think I\'m going to right a tutorial on Rigging Characters  for PS after I finish my Klyros & maybe after the Female one is done.

Try modeling the arm as a state cylinder & then bending it later on... 8)

CB Characters: Zeph Waterfox & Zeraph Waterfox MB: Zph